NAVTY P1 GUIDE
1. IN-CAR INSTALLATION
- 1.1. Assembly
- 1.2. Instructions
2. PERFORMANCE MODE
- 2.1. Download
- 2.2. Firmware Update
- 2.3. Controls
- 2.4. Settings
- 2.5. Menu / Configuration
3. P1R FIRMWARE ADD-ON
- 3.1. Download
- 3.2. Installing Add-On
- 3.3. Activating Add-On
- 3.4. Removing Add-On
- 3.5. Controls
- 3.6. Settings
- 3.7. Menu / Configuration
4. POI DATABASE
- 4.1. Download
- 4.2. Updating Database
- 4.3. Clearing Database
1. IN-CAR INSTALLATION
We have provided you with everything you need to install the system within a matter of minutes.
ASSEMBLY
- First connect the 12V power cable provided with the P1 on the side (5) and then connect this to the 12V port in the car.
- Secure the bracket in the slot at the front. Unlock the bracket using the button in the centre (6).
- Attach the P1 to your windscreen using the suction pads and adjust the device until it sits horizontally. Ensure that your view through the window is not obstructed.
Attention: metal may interfere with the device reception. Therefore, please check whether your vehicle is fitted with a metallised or heatable windscreen. If this is the case, you should find out if there is an area of your windscreen intended for the installation of electronic devices. In most vehicles there is an area located near the rear-view mirror. The Navty P1 should be placed here to ensure you can use its full range of functions.
Note: protect the device from extended exposure to sunlight.
2. PERFORMANCE MODE
DOWNLOAD
Current P1 firmware for the Navty P1 with Performance Mode: NAVTY P1 FIRMWARE
FIRMWARE UPDATE
- Download the current FIRMWARE and copy it onto a USB stick.
- Disconnect your P1 from the power supply and connect the USB stick with the Navty P1.
- Re-connect the Navty P1 with the power supply. The P1 will turn on and the update will be installed automatically.
- Once the update has been successfully installed (wait for a notification on the display), reboot the P1.
CONTROLS
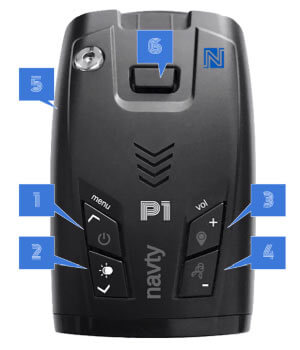
(1) Short tap – open menu & scroll up in menu
(1) Press for 3 seconds – TURN ON/OFF
(2) Short tap – display brightness & scroll down in menu
(3) Short tap – volume + & change options in menu
(4) Short tap – volume – & change options in menu
(5) 12V power connection port
(6) Unlock windscreen bracket
SETTINGS
By tapping the button (1) You can access the settings menu and configure the Navty P1 to meet your needs.
- Menu selection with (1) MENU ? or (2) MENU ?
- Change the settings with (3) VOL + or (4) VOL –
- After 4 seconds of inactivity, the device leaves the menu automatically and your settings are saved
MENU / CONFIGURATION (entries marked BLUE are standard factory settings)
- DISPLAY INFORMATION: CURRENT SPEED & DRIVING DIRECTION / CURRENT SPEED & TIME / CURRENT SPEED & ON-BOARD VOLTAGE / DRIVING PERFORMANCE
- ROTATE DISPLAY 180°: ON / OFF
- DRIVING PERFORMANCE: ON / OFF
- TIME ZONE: 12H
- LANGUAGE: ENGLISH / DEUTSCH / FRANÇAIS / ESPAÑOL
- UNIT: METRISCH (kmh) / ENGLISCH (mph)
- FACTORY SETTINGS: press the button (4) VOL – for 3 seconds to restore the factory settings.
- QUIT MENU: press button (3) VOL + or (4) VOL – to leave the menu and save the configuration settings.
3. P1R FIRMWARE ADD-ON
DOWNLOAD
Current P1R firmware add-on with real-time radar and laser recognition: NAVTY P1R FIRMWARE ADDON
INSTALL ADD-ON
- Download the current FIRMWARE and copy it onto a USB stick.
- Disconnect your P1 from the power supply and connect the USB stick with the Navty P1.
- Re-connect the Navty P1 with the power supply. The P1 will turn on and the update will be installed automatically.
- Once the update has been successfully installed (waiting for a notification on the display), reboot the P1.
ACTIVATING ADD-ON
- Ensure that the P1R add-on has been successfully installed and then disconnect your P1 from the power supply.
- Hold down buttons (2) + (4) at the same time for 10 seconds while reconnecting the P1 to the power supply.
REMOVING ADD-ON
To make sure than no expansions or add-ons are installed, you can remove these using a button combination. To do so, press the buttons (2) + (4) at the same time for 3 seconds until “Performance Mode” is shown on the display. This immediately deletes all add-ons and these can only be activated again by way of an add-on update.
CONTROLS

(1) Short tap – open menu & scroll up in menu
(1) Press for 3 seconds – TURN ON/OFF
(2) Short tap – display brightness & scroll down in menu
(3) Short tap – volume + & change options in menu
(3) Press for 3 seconds – save your own GPS hazard zone (only while driving)
(4) Short tap – volume – & change options in menu
(4) Press for 3 seconds – remove/lock GPS hazard zone (only while driving)
(5) 12V power connection port
(6) Unlock windscreen bracket
(2) + (4) At the same time for 3 seconds – remove P1R add-on
SETTINGS
By tapping the button (1) You can access the settings menu and configure the Navty P1 to meet your needs.
- Menu selection with (1) MENU ? or (2) MENU ?
- Change the settings with (3) VOL + or (4) VOL –
- After 8 seconds of inactivity, the device leaves the menu automatically and your settings are saved
MENU / CONFIGURATION (entries marked BLUE are standard factory settings)
- ALERT MINIMUM SPEED: OFF / 10 / 20 / ..130 km/h
- AUTO CITY SPEED: OFF / 10 / 20.. 60 / ..130 km/h
- CITY SENSITIVITY: 10 / 20.. 70% ..90 %
- AUTO MUTE: ON / OFF
- DISPLAY INFORMATION: CURRENT SPEED & DRIVING DIRECTION / CURRENT SPEED & TIME / CURRENT SPEED & ON-BOARD VOLTAGE / DRIVING PERFORMANCE
- RADAR INFORMATION: STANDARD / FREQUENCY / THREAT
- DISPLAY ROTATE 180°: ON / OFF
- DRIVING PERFORMANCE: ON / OFF
- RADAR SETTINGS: RECOMMENDED / MANUAL*
- LASER: ON / OFF
- MULTA CD CT: ON / OFF
- X BAND: ON / OFF
- K BAND: OFF / NARROW / FULL
- KA BAND: OFF / ON / MANUAL**
- KA 1 – 33.550: ON / OFF
- KA 2 – 33.800: ON / OFF
- KA 3 – 34.000: ON / OFF
- KA 4 – 34.300: ON / OFF
- KA 5 – 34.700: ON / OFF
- KA 6 – 35.000: ON / OFF
- KA 7 – 35.260: ON / OFF
- KA 8 – 35.550: ON / OFF
- KA 9 – 35.715: ON / OFF
- KA 10 – 35.915: ON / OFF
- POP: ON / OFF
- BSM FILTER: ON / OFF
- TSR FILTER: ON / OFF
- TIME ZONE: 12H
- GPS POI WARNING: OFF / ON / MANUAL***
- SPEED CAMERA: ON / OFF
- REDLIGHT CAMERA: ON / OFF
- FREQUENT DANGER ZONE: ON / OFF
- SECTION CONTROL: ON / OFF
- POI WARNING DISTANCE: 200 / 300 / 500 / 750 m
- LANGUAGE: ENGLISH / DEUTSCH / FRANÇAIS / ESPAÑOL
- UNIT: METRIC (kmh) / ENGLISH (mph)
- FACTORY SETTINGS: press the button (4) VOL – for 3 seconds to restore the factory settings.
- FACTORY RESET: press the button (4) VOL – for 3 seconds to carry out a factory reset.
- REMOVE ALL MARKERS: Press the button (4) VOL – for 3 seconds to delete all of your own POIs.
- REMOVE ALL ALARM LOCKS: Press the button (4) VOL – for 3 seconds to delete all alarm locks.
- QUIT MENU: press button (3) VOL + or (4) VOL – to leave the menu and save the configuration settings.
- 9.1. *MANUAL MODE RADAR SETTINGS
- 9.1.1. **MANUAL MODE KA-BAND
- 11.1. ***MANUAL MODE GPS POI WARNING
4. POI DATABASE
DOWNLOAD
Download the current speed camera database: European speed cameras or Worldwide speed cameras (including Europe)
Instructions: For details on permanent radar traps, the P1R firmware add-on must be installed.
UPDATING DATABASE
- Download the current POI database and copy it onto a USB stick.
- Disconnect your P1 from the power supply and connect the USB stick with the Navty P1.
- Re-connect the Navty P1 with the power supply. The P1 will turn on and the database update will be installed automatically.
- Once the update has been successfully installed (waiting for a notification on the display), reboot the P1.
CLEARING DATABASE
To make sure than no POI database is installed, you can remove this using a button combination. To do so, press the buttons (2) + (4) at the same time for 3 seconds until “Performance Mode” is shown on the display.
Navty P1 guide
Download PDF instructions